Creating a New View
Custom Views can be created via the Drop-down Views menu button when viewing a Table, Gantt Chart, or Board. Having custom views allows for you to switch between them, depending on your needs. Alternatively, other users may require different views, depending on their needs or role.
To create a custom view:
- Press the Dropdown Views button.
- In the dropdown menu that appears, select Create View.

-
Pressing Create View will bring up the configuration for the view. The initial configuration fields for the view will default to the values being used for the current view. Essentially, this means when you create a new view, you clone the current view, and then can make changes and adjustments to it.
-
Inputting any sorting or filtering within the Edit View flyout will commit those changes to the view after it is created. After giving the view a title, you will now be able to create it. The process of creating a new view is explained below.
Once a view is created, it will be available from the Views Dropdown menu button, unless it is hidden by a System Administrator. Each of the sections of the view creation side panel are explained below.
Edit View Sidepanel
When creating a view (or editing it via the Edit View Panel Button, Rapid's Edit View Sidepanel will open.

The sidepanel and its features are explained below.
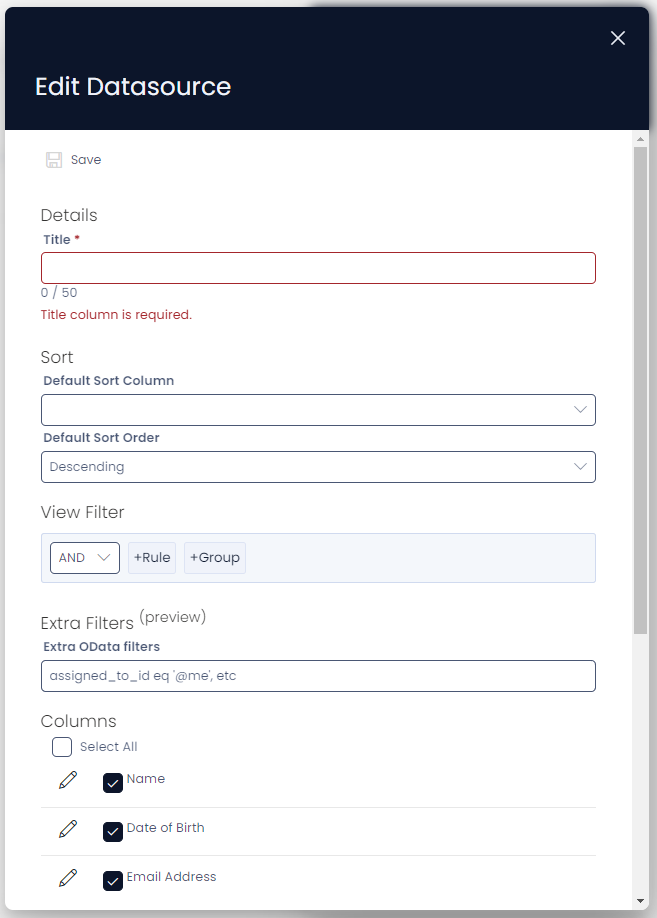
Details
Every View requires a title. The side panel will not allow you to save a View unless it has a title. Note that the title will appear in the dropdown menu with the other created views.

Sort
The default sorting filter on a Data Table is Created Date, meaning that the newest items will be at the top. This, however, is not always desirable.

To enable a sorting filter, open the Default Sort Column dropdown menu, and then select the column you wish to sort by. Then, press the Default Sort Order dropdown menu, and choose either Ascending or Descending.
| Sort Type | Text | Numbers | Dates | Choices |
|---|---|---|---|---|
| Ascending | Alphabetical: A is at the top of the list, and Z is at the end. | Smaller numbers are at the top of the list, and larger numbers are at the end. | Chronological: Earlier dates are the top of the list, and later dates are at the end. | Alphabetical: Choices are arranged like text. |
| Descending | Reverse-Alphabetical: Z is at the start of the list, and A is at the end. | Larger numbers are at the top of the list, and smaller numbers are at the end. | Reverse-Chronological: Later dates are the top of the list, and earlier dates are at the end. | Reverse-Alphabetical: Choices are arranged like text. |
View Filter
Column filtering allows you to show or hide items from the view.

Rule-based filtering allows you to narrow down the dataset with more precision than exclusively using the Quick Filter.
The following rules are supported by Rapid. Adding a rule requires you to define the exact column that the rule should apply to. To open configuration for the rules press the edit view button, then to add a rule press the + Rule button.
| Rule | Symbol | Description |
|---|---|---|
| Exact String Match | = | Only returns rows where the specified column is an exact match to the input value. |
| Does Not Equal | != | Only returns rows where the specified column is not equal to the input value. |
| Greater Than | > | Returns rows where the specified column is a greater value than input value. |
| Greater than or equal | >= | Returns rows where the specified column is a greater value than input, or an equal value to the input value. |
| Less Than | < | Returns rows where the specified column is a smaller value than input value. |
| Less than or equal | <= | Returns rows where the specified column is a smaller value than input, or an equal value to the input value. |
| Not Nil Check | has value | Returns rows where the specified column contains any value. |
| Nil Check | no value | Returns rows where the specified column does not contain any value. |
| Partial String Match | contains | Returns rows where the specified column contains part of the input value. |
It is also important to note that all symbols can be used for strings as well as integers.
It is possible to add multiple rules, the behaviour for adding multiple rules depends on the operator chosen. As a user, you can also specify whether the rule group obeys OR rules or AND rules.
- The
ORrule specifies that an item should be returned if any of the rules match their respective column's value. - The
ANDrule specifies that all of the rules in a group must match their respective column's value.
Extra Filters

When using the view extra filters these tokens are available:
- @me
- @startOfQuarter
- @endOfQuarter
- @startOfMonth
- @endOfMonth
- @startOfWeek
- @endOfWeek
- @today
- @tomorrow
Note that each of these tokens will need to be enclosed in single quotation marks:
e.g.
'@me'or'@startOfQuarter'
In the example above, assigned_to_id eq '@me' will do the following:
assigned_to_id: This is the name of a User Field. We can assign who an item is "Assigned To", and then choose the ID of a particular user.eq: This is the equivalence operand. It checks whether the data inside of theassigned_to_idis the same as the variable that follows this operand.'@me': This tells Rapid to find the ID number of "me", or the user currently logged into Rapid.
When put together, this OData filter tells Rapid: Show me the items that are assigned to me.
Columns
In this section of the side panel, you can select which columns will appear in the view, as well as the order they appear in, and how large each column should be displayed.
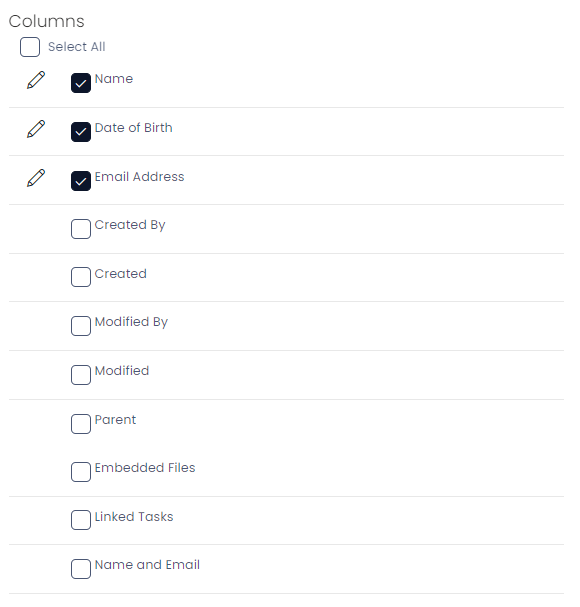
For your convenience, a Select All button is located at the top of the list. Note that this will include the System Fields, however.
Edit Column
Each column list item begins has a pencil icon at the far left. Pressing this pencil button opens the Edit Column side panel.
![]()
The side panel allows you to set the minimum and maximum pixel widths of a field. Each column in a Data Table may have a varied width, depending on the size of the browser window.
Placing number values into these fields will prevent item columns from shrinking too small (the minimum size) or stretching too large (the maximum size).

You can Save your changes to the column, or Cancel the changes without saving.
Column Checkbox
The checkbox next to each column allows you to select which columns should appear (ticked), and which columns should be hidden (unticked).
![]()
Column Drag-and-Drop
Clicking and dragging on the name of a column will allow you to change what order a column appears in the view. For example, if we wanted the Email Address to appear as the first column in the view:
- Press and hold the name of the column that you wish to reorder.
- Drag the column name to the place where you wish it to be located (in this example, it will be located before the Name field).
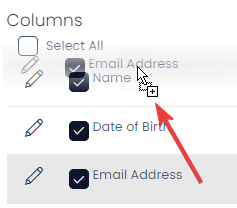
- Releasing the cursor will cause the column to now change its order.
